This blog accompanies our BDD SpecFlow training course. It takes you step by step through installing Pickles and configuring reports in Pickles UI.
Step 1 – Install Chocolatey
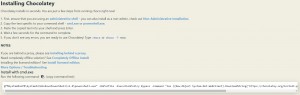
- Go to https://chocolatey.org/
- Click Install
- Copy the link below the Installing Chocolatey section:
@"%SystemRoot%\System32\WindowsPowerShell\v1.0\powershell.exe" -NoProfile -ExecutionPolicy Bypass -Command "iex ((New-Object System.Net.WebClient).DownloadString('https://chocolatey.org/install.ps1'))" && SET "PATH=%PATH%;%ALLUSERSPROFILE%\chocolatey\bin"
- Open a command prompt as an Administrator, paste in the link and hit enter
- After a few seconds, chocolatey should be installed
- Check it has been installed by entering: choco

Step 2 – Install Pickles UI
- Now enter: choco install picklesui

- You should receive a message telling you that the installation of PicklesUI was successful
- Now we can launch PicklesUI
Step 3 – Configuring PicklesUI
- Enter into the Command Prompt: picklesui
- This should then open PicklesUI (This may take a few seconds if it is your first time using PicklesUI)
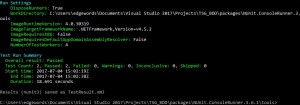
- Now to get PicklesUI to generate reports for us we must first run our tests from the command line as when we run our tests using the NUnit3 Console Runner. This will create an NUnit3 Results file, which is called TestResults.xml by default, in order to get this result:
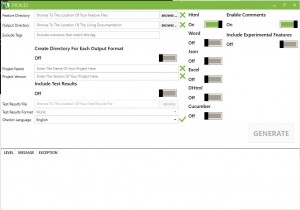
- Now we can go ahead and modify PicklesUI to generate reports for us:
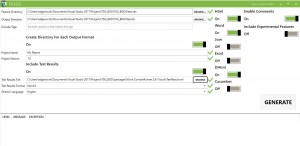
- Feature Directory – paste the file path to your feature files
- Output Directory – paste the file path to a results directory you want your generated reports to go to
- Create Directory For Each Output Format – On (optional)
- Project Name – The name given to your reports
- Project Version – The version given to your reports
- Include Test Results – On
- Test Results Format – Nunit3 (Ensure it is NUnit3 and not just NUnit)
- Gherkin Language – English (dependent on your native language)
NOTE: Finally on the right hand side you can turn on, whichever format of report you want to be generated, Html, Word, DHtml etc. (In the above example, I have turned on Html, Word and DHtml)
- And finally click Generate
Step 4 – View Results
- Once PicklesUI has finished generating the reports, they should now be available in your Output Directory (See previous step):
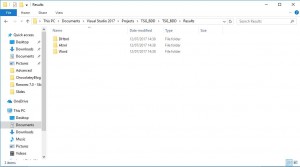
- Now you will want to navigate inside one of your reports folders and open the index.html file
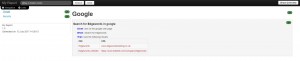
- This is an example of a DHtml(Dynamic HTML) report:
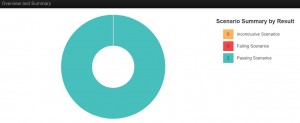
- If you click Show Overview in the top right of the page, this will give you an overview of your tests, in a user friendly format:
For more information regarding BDD, please see our:
[…] can then use a results viewer like PicklesUI to convert the results to html, Word, Excel […]